English translation of the Norwegian library. Product names and original documents retain their source language. Model-specific maintenance steps have been reviewed; other text uses assisted translation. Check the original manual before work.
Combined guide – print or save as PDF
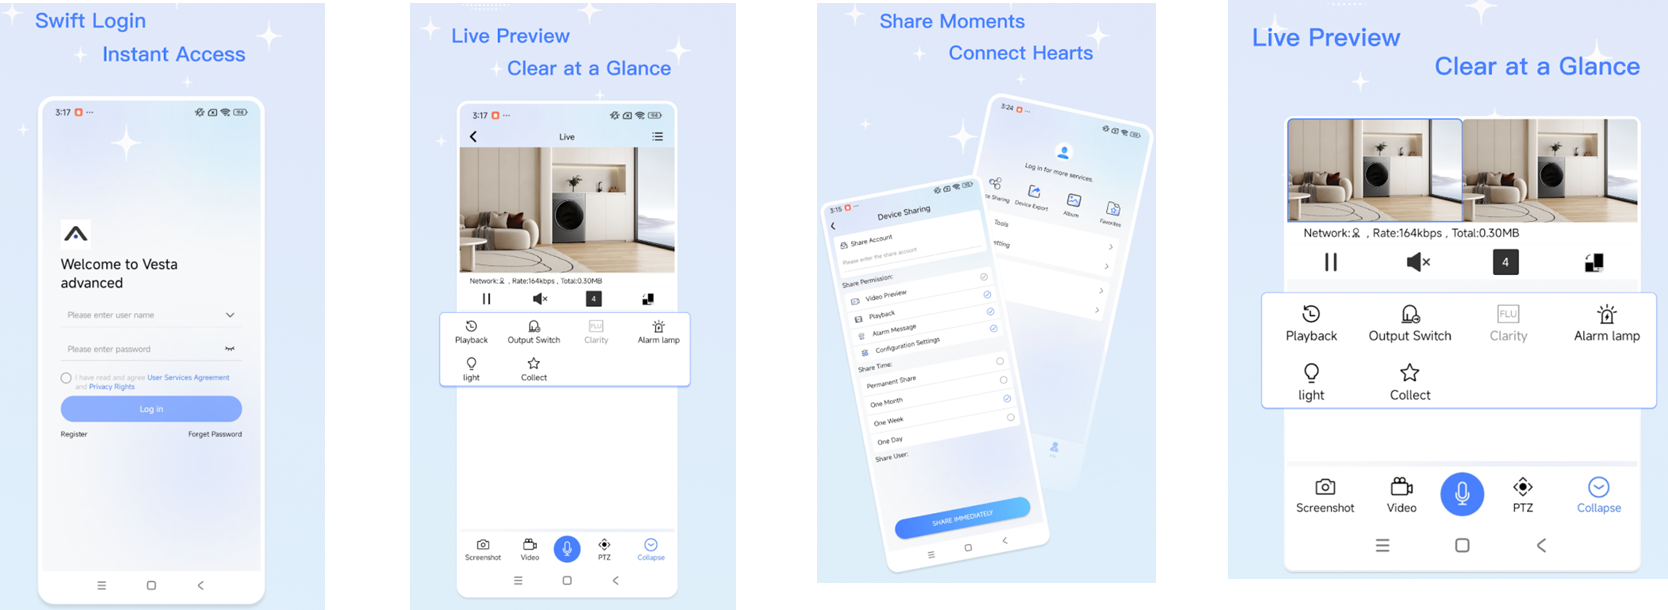
Vesta Advanced: the right app and first connection
For standalone Vesta Advanced cameras or NVRs. SmartHomeSec integration has a separate guide.
For customers
Follow these steps
Confirm the system is set up for VESTA Advanced. Use the app store links in the GitBook source below. Do not choose an app just because its icon looks similar.
Image status for this step
A dedicated image of this step has not been verified.
Install the app. Follow the manufacturer’s app video for account and device registration; the video does not state an app version.
Original illustration from the source below. Menus and appearance may vary by version. Select to enlarge. · Source
Register the camera or recorder using the serial number on its label or documentation. Ask the owner or installer to resolve access if it already belongs to another account.
Image status for this step
A dedicated image of this step has not been verified.
Open the correct camera and check that the image timestamp updates. A saved preview is not confirmation of live video.
Image status for this step
A dedicated image of this step has not been verified.
What you should be able to confirm
You see the correct camera with current live video.
After service, confirm the result with the user and notify the system manager/monitoring station as agreed. One working function does not mean the whole case is resolved.
If registration fails, note the exact message and whether it concerns the account, serial number or device connection. Do not delete an existing system to retry.
For cameras/NVRs in the VESTA Advanced app. These are initial checks, not a confirmed diagnosis.
For customers
Follow these steps
Check whether all cameras are missing or only one channel. Note the device name and error text.
Original illustration from the source below. Menus and appearance may vary by version. Select to enlarge. · Source
Check that the phone has internet access. Then try another available connection, such as mobile data, and compare.
Image status for this step
A dedicated image of this step has not been verified.
Check visible power and network status at the camera/recorder without opening it. If the recorder has a local picture, tell the installer.
Image status for this step
A dedicated image of this step has not been verified.
Open the same camera again in the app. Use the app video if you are unsure how to select the camera or channel.
Image status for this step
A dedicated image of this step has not been verified.
What you should be able to confirm
Live video updates and the correct channel is selected.
After service, confirm the result with the user and notify the system manager/monitoring station as agreed. One working function does not mean the whole case is resolved.
If local video works but the app does not, the installer must check remote connectivity and access. No dedicated official error video was found for this message; the app video demonstrates operation.
SmartHomeSec: recording icon appears but video will not play
Only Vesta Advanced video integrated in SmartHomeSec. Installer checks are identified below.
For customers
Follow these steps
Note the camera and event time. Check whether that time plays in the camera or NVR’s own playback.
Image status for this step
A dedicated image of this step has not been verified.
Installer: compare time, time zone and daylight saving settings on the camera/NVR with the Vesta panel. A time offset can make the system search the wrong recording period.
Image status for this step
A dedicated image of this step has not been verified.
Installer: check that continuous recording is enabled and MicroSD/HDD storage is working. An event icon does not prove that video was stored.
Image status for this step
A dedicated image of this step has not been verified.
Installer: follow the GitBook section “Event Playback Troubleshooting Guide”, including multimedia settings. Arrange a new controlled test after correction.
Image status for this step
A dedicated image of this step has not been verified.
What you should be able to confirm
A new test recording opens at the correct event time.
After service, confirm the result with the user and notify the system manager/monitoring station as agreed. One working function does not mean the whole case is resolved.
Vesta Advanced: IVS does not produce the expected events
For cameras supporting the selected IVS rule. Configuration should be performed by the system manager or installer.
For staff / installer
Follow these steps
Identify the camera and rule: intrusion, tripwire or cross-region. Confirm the model supports it.
Image status for this step
A dedicated image of this step has not been verified.
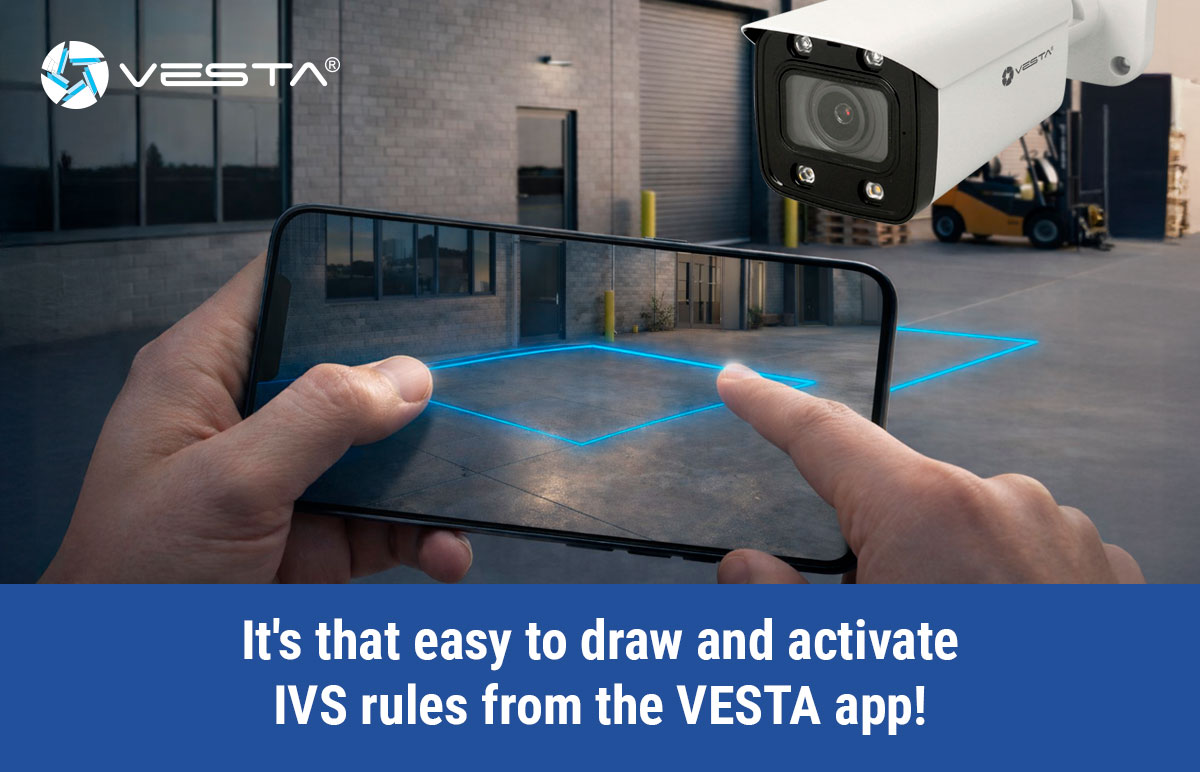
Open the specific IVS video below. Compare the configured area or line with what should be detected.
Image status for this step
A dedicated image of this step has not been verified.
Review rule activation and recording setup as shown in the video. Change only the agreed rule.
Image status for this step
A dedicated image of this step has not been verified.
Perform an agreed test in the specified area. Check event registration first, then recording and finally the phone notification.
Image status for this step
A dedicated image of this step has not been verified.
What you should be able to confirm
The test produces the correct event and agreed playback or notification.
After service, confirm the result with the user and notify the system manager/monitoring station as agreed. One working function does not mean the whole case is resolved.
Images and original drawingsBy Demes: illustration of IVS areas. This is a presentation illustration, not a menu screenshot. · Source
Do not use siren status as proof that phone notifications are enabled. Vesta documents that in version 2.5.0 the padlock controls lights/siren; notification synchronisation was not included.
Based on Vesta’s description of 2.5.0 dated 25 June 2026. This is a documented version, not a claim about the latest app release.
For customers
Follow these steps
For slow recording searches, use the playback timeline. Vesta describes faster searching in 2.5.0.
Image status for this step
A dedicated image of this step has not been verified.
For poor image quality, check lighting before changing WDR, SMART IR, day/night or image flip. Note the original value and change one setting at a time.
Image status for this step
A dedicated image of this step has not been verified.
If WideSeek is missing, check the camera model. The documented introduction covers IPC-T/B38-A180-AS-PV; support is not confirmed for every camera.
Image status for this step
A dedicated image of this step has not been verified.
Do not use SD formatting as routine troubleshooting. It deletes recordings and belongs to planned maintenance.
Image status for this step
A dedicated image of this step has not been verified.
What you should be able to confirm
You have established whether the feature is supported and can compare the result with the previous setting.
After service, confirm the result with the user and notify the system manager/monitoring station as agreed. One working function does not mean the whole case is resolved.
Images and original drawingsOriginal illustration from the source below. Menus and appearance may vary by version. Select to enlarge. · Source
SmartHomeSec: requests CGI even though CGI is enabled
For Vesta Advanced integration. This is an installer task.
For staff / installer
Follow these steps
Confirm the exact CGI error and that it concerns the correct camera.
Image status for this step
A dedicated image of this step has not been verified.
Check whether user rights changed recently or another recorder initialised the camera. GitBook identifies these as possible causes.
Image status for this step
A dedicated image of this step has not been verified.
Compare camera settings with the “CGI Activation Issues” section in the source. Document existing settings before any intervention.
Image status for this step
A dedicated image of this step has not been verified.
What you should be able to confirm
The installer has identified the cause and verified communication with SmartHomeSec.
After service, confirm the result with the user and notify the system manager/monitoring station as agreed. One working function does not mean the whole case is resolved.
Watch the relevant procedure
No dedicated troubleshooting video has been verified for this task. Use the specific written source below.
Still not resolved?
The source proposes a factory reset for this specific configuration issue. It must be planned with the owner and configuration recovery; it is not the first customer step.
For an already initialised Dahua device. You need authorised access to the device.
For customers
Follow these steps
On the recorder or web interface, check that Settings → Network → P2P is enabled and Online. Ask the installer if you do not have access.
Image status for this step
A dedicated image of this step has not been verified.
In DMSS select + / Add Device and Scan QR Code. Allow camera access and scan the serial number code, or choose Manually Enter SN.
Image status for this step
A dedicated image of this step has not been verified.
Check the serial number and continue. Enter the device password when requested; this is not the DMSS account password.
Image status for this step
A dedicated image of this step has not been verified.
Give the device a recognisable name, check time zone/daylight saving and finish. Open a camera to verify access.
Image status for this step
A dedicated image of this step has not been verified.
What you should be able to confirm
The device appears in the list and displays current video.
After service, confirm the result with the user and notify the system manager/monitoring station as agreed. One working function does not mean the whole case is resolved.
Watch the relevant procedure
No dedicated troubleshooting video has been verified for this task. Use the specific written source below.
Still not resolved?
Already linked to another account? Ask the owner to share access. Do not delete, factory-reset or try to take over the device.
For Dahua devices already added to DMSS. DahuaWiki illustrations may differ from your app version.
For customers
Follow these steps
Open the device list and tap the play button beside the correct recorder or camera.
Image status for this step
A dedicated image of this step has not been verified.
If only four channels appear, swipe left in the camera view to see the next ones. A channel missing from the first screen does not necessarily mean camera failure.
Image status for this step
A dedicated image of this step has not been verified.
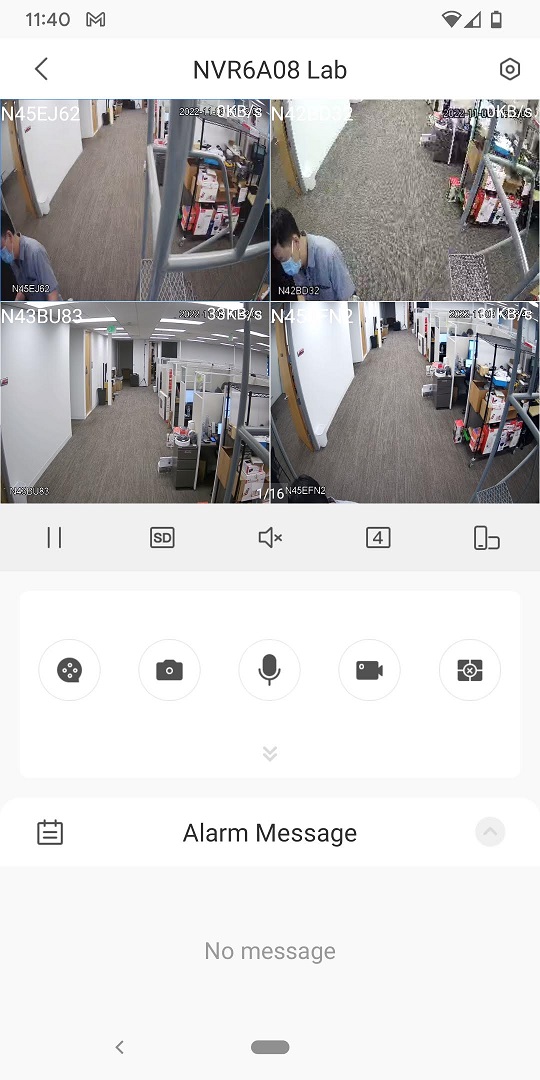
To select channels yourself, open Live, tap the channel selector at the top right, select the cameras and choose Start Live View.
Original illustration from the source below. Menus and appearance may vary by version. Select to enlarge. · Source
What you should be able to confirm
The correct camera shows updating video.
After service, confirm the result with the user and notify the system manager/monitoring station as agreed. One working function does not mean the whole case is resolved.
For cameras with recordings on device storage. Live view alone does not mean recordings exist.
For customers
Follow these steps
Open Playback, select an empty camera tile and choose one channel. The app normally starts with today’s footage.
Image status for this step
A dedicated image of this step has not been verified.
Tap the date above the timeline. Choose the day and correct Record Type. Days with the playback icon have available recordings in this view.
Original illustration from the source below. Menus and appearance may vary by version. Select to enlarge. · Source
Tap OK and move the timeline to the event. Check camera name, date and time offset before concluding the recording is missing.
Image status for this step
A dedicated image of this step has not been verified.
What you should be able to confirm
You can play the relevant time from the correct camera.
After service, confirm the result with the user and notify the system manager/monitoring station as agreed. One working function does not mean the whole case is resolved.
If the period is still missing, ask the installer to check the recording schedule, disk/card and clock. Do not format storage; it does not recover missing recordings.
For recordings you are authorised to export. The clip is saved to the phone; this does not send it to support.
For customers
Follow these steps
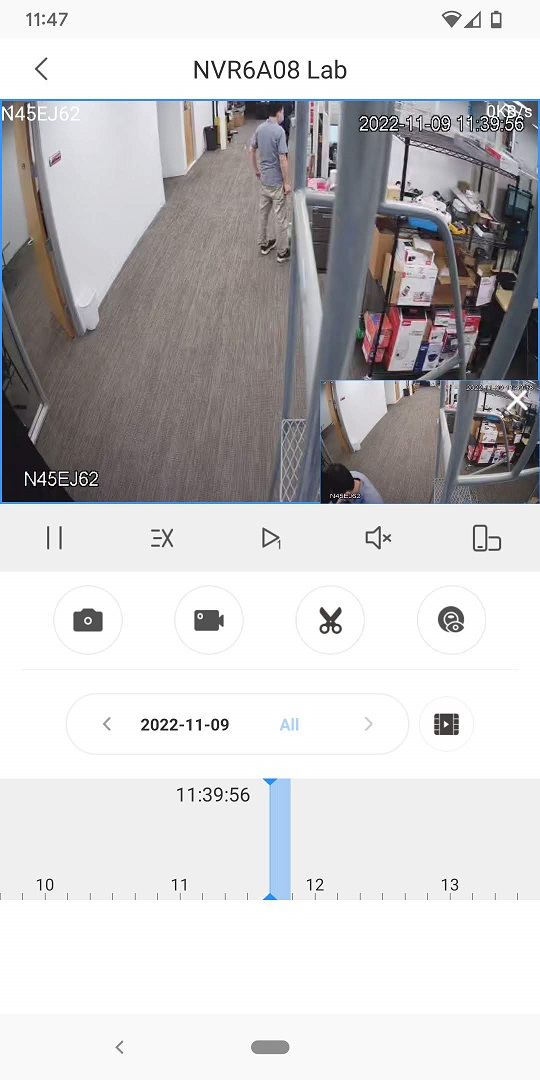
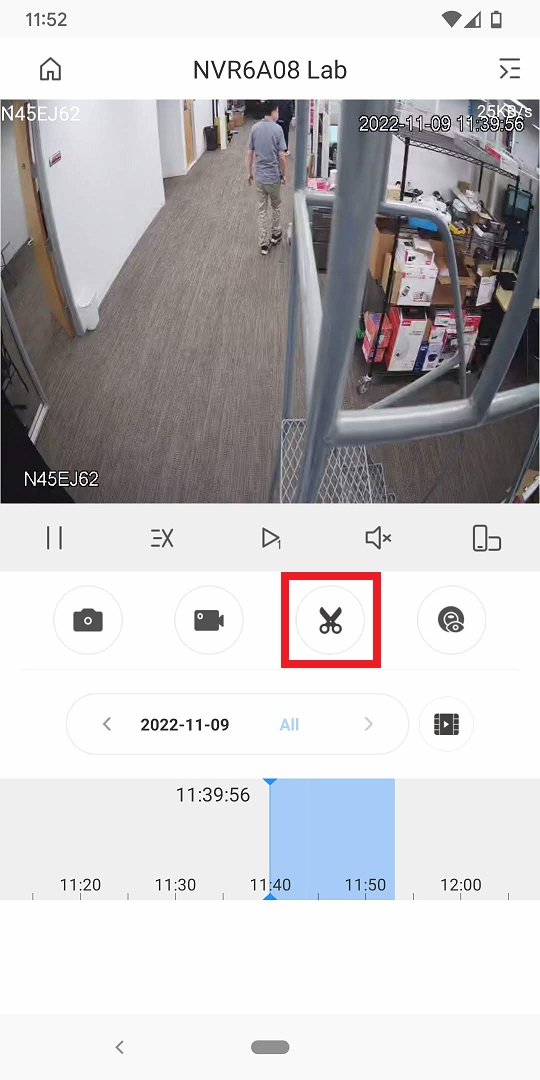
Find the camera and period in Playback. Tap the scissors icon.
Image status for this step
A dedicated image of this step has not been verified.
Move the timeline to the start and tap Play. Move to the end and tap Stop. Confirm saving with OK.
Original illustration from the source below. Menus and appearance may vary by version. Select to enlarge. · Source
Wait for the download. Go to Me → My Files → Video.
Image status for this step
A dedicated image of this step has not been verified.
Select Edit, mark the clip and use Save to store it on the phone. Open the file and check the start, end and correct camera.
Image status for this step
A dedicated image of this step has not been verified.
What you should be able to confirm
The exported clip plays from the phone’s storage.
After service, confirm the result with the user and notify the system manager/monitoring station as agreed. One working function does not mean the whole case is resolved.
For a DMSS account with access to the camera and relevant events.
For customers
Follow these steps
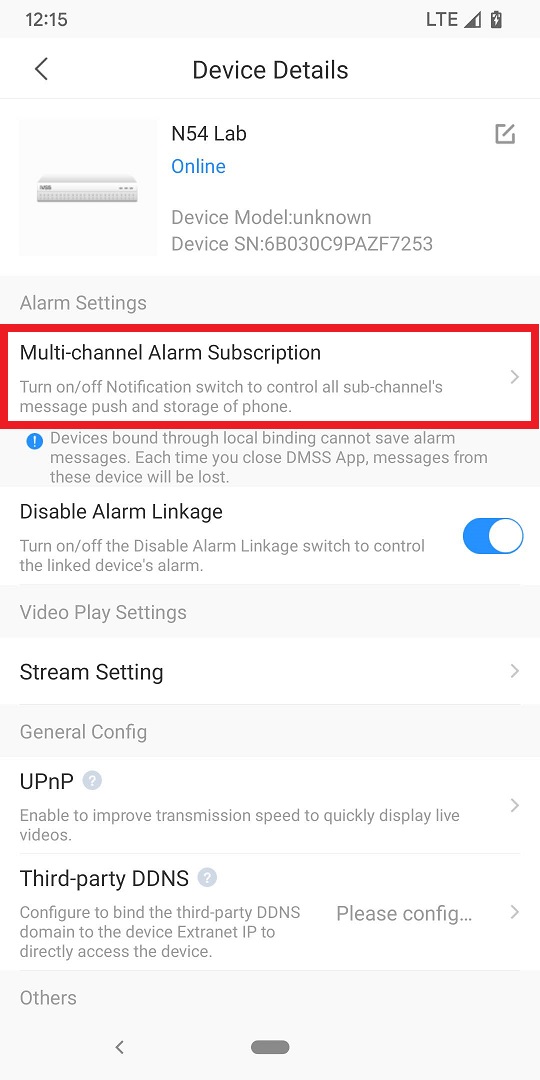
At the device, tap … → Device Details → Multi-channel Alarm Subscription.
Original illustration from the source below. Menus and appearance may vary by version. Select to enlarge. · Source
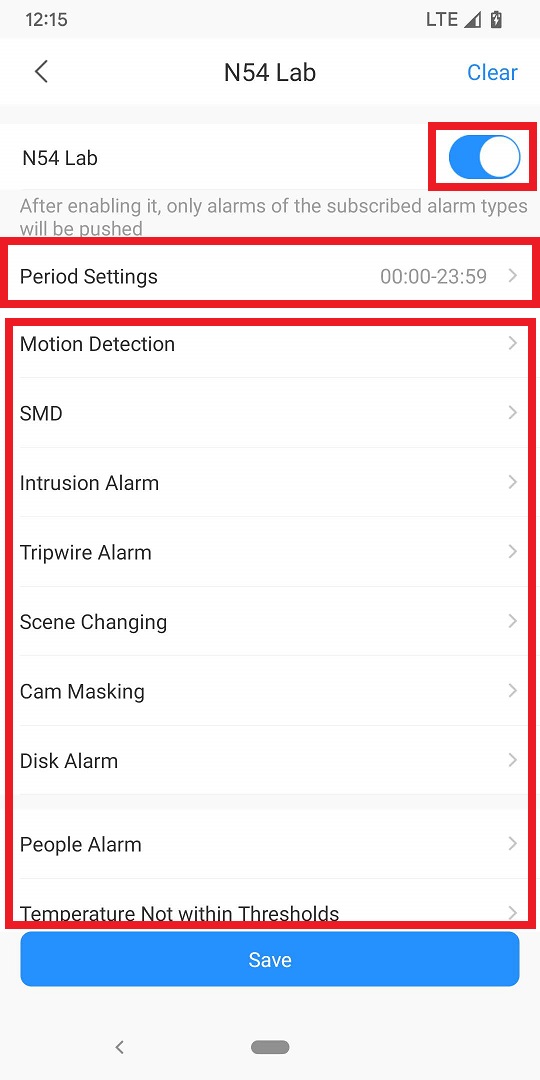
Enable the subscription. Check Period Settings and choose the event type you actually want notifications for.
Original illustration from the source below. Menus and appearance may vary by version. Select to enlarge. · Source
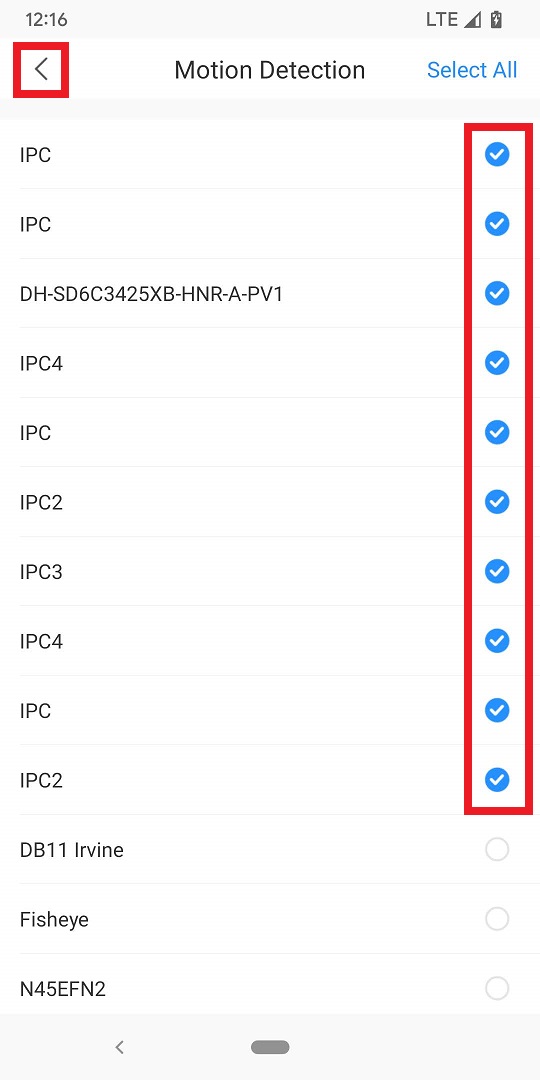
Select the camera channels. Go back, check the channel count beside the event type and tap Save.
Original illustration from the source below. Menus and appearance may vary by version. Select to enlarge. · Source
Check the phone’s notification permission for DMSS and any focus/silent settings. Perform an agreed test of the selected event.
Image status for this step
A dedicated image of this step has not been verified.
What you should be able to confirm
The agreed event produces a notification on the correct phone.
After service, confirm the result with the user and notify the system manager/monitoring station as agreed. One working function does not mean the whole case is resolved.
Watch the relevant procedure
No dedicated troubleshooting video has been verified for this task. Use the specific written source below.
Still not resolved?
If the event is absent from the recorder log, detection/configuration must be checked first. Changing the phone cannot create an event that was never registered.
Initial checks for Dahua P2P. Network changes belong to the installer or IT administrator.
For customers
Follow these steps
Check the phone’s internet connection. Compare Wi-Fi and mobile data without changing recorder settings.
Image status for this step
A dedicated image of this step has not been verified.
Check the visible network cable between recorder and router/switch. Note whether local video works.
Image status for this step
A dedicated image of this step has not been verified.
On the recorder/web interface, check that P2P is enabled and Online. Compare the serial number with the device registered in DMSS.
Image status for this step
A dedicated image of this step has not been verified.
If P2P is Online but login is rejected, verify the device username/password with the owner. The DMSS account password is different.
Image status for this step
A dedicated image of this step has not been verified.
What you should be able to confirm
DMSS shows current video over the intended remote connection.
After service, confirm the result with the user and notify the system manager/monitoring station as agreed. One working function does not mean the whole case is resolved.
Watch the relevant procedure
No dedicated troubleshooting video has been verified for this task. Use the specific written source below.
Still not resolved?
If still Offline, give the installer the P2P status, time and whether local video works. Do not change DHCP/DNS or open ports at random.
For a device owner granting access to another DMSS account.
For customers
Follow these steps
First check that you are using the correct DMSS account. If the camera was shared with you, ask the owner to check the sharing is still valid.
Image status for this step
A dedicated image of this step has not been verified.
Owner: open … beside the device and select Share Device. Choose the whole device or only the agreed channels.
Image status for this step
A dedicated image of this step has not been verified.
Select permissions and the correct recipient account. Play Video grants live view; choose other permissions as needed. Verify the recipient before confirming sharing.
Image status for this step
A dedicated image of this step has not been verified.
Ask the recipient to check live view and the agreed functions. If a device is missing from the sharing list, check that it is account-bound, supports sharing and that you are its owner.
Image status for this step
A dedicated image of this step has not been verified.
What you should be able to confirm
The recipient sees only the agreed cameras and functions.
After service, confirm the result with the user and notify the system manager/monitoring station as agreed. One working function does not mean the whole case is resolved.
Watch the relevant procedure
No dedicated troubleshooting video has been verified for this task. Use the specific written source below.
Still not resolved?
Do not share the owner’s password as a workaround. Resolve account binding and ownership before any transfer.
Yale Classic / V2N: dead batteries – open using 9 V
For Yale Doorman Classic / V2N. You need a 9 V battery and a valid code or key tag.
For customers
Follow these steps
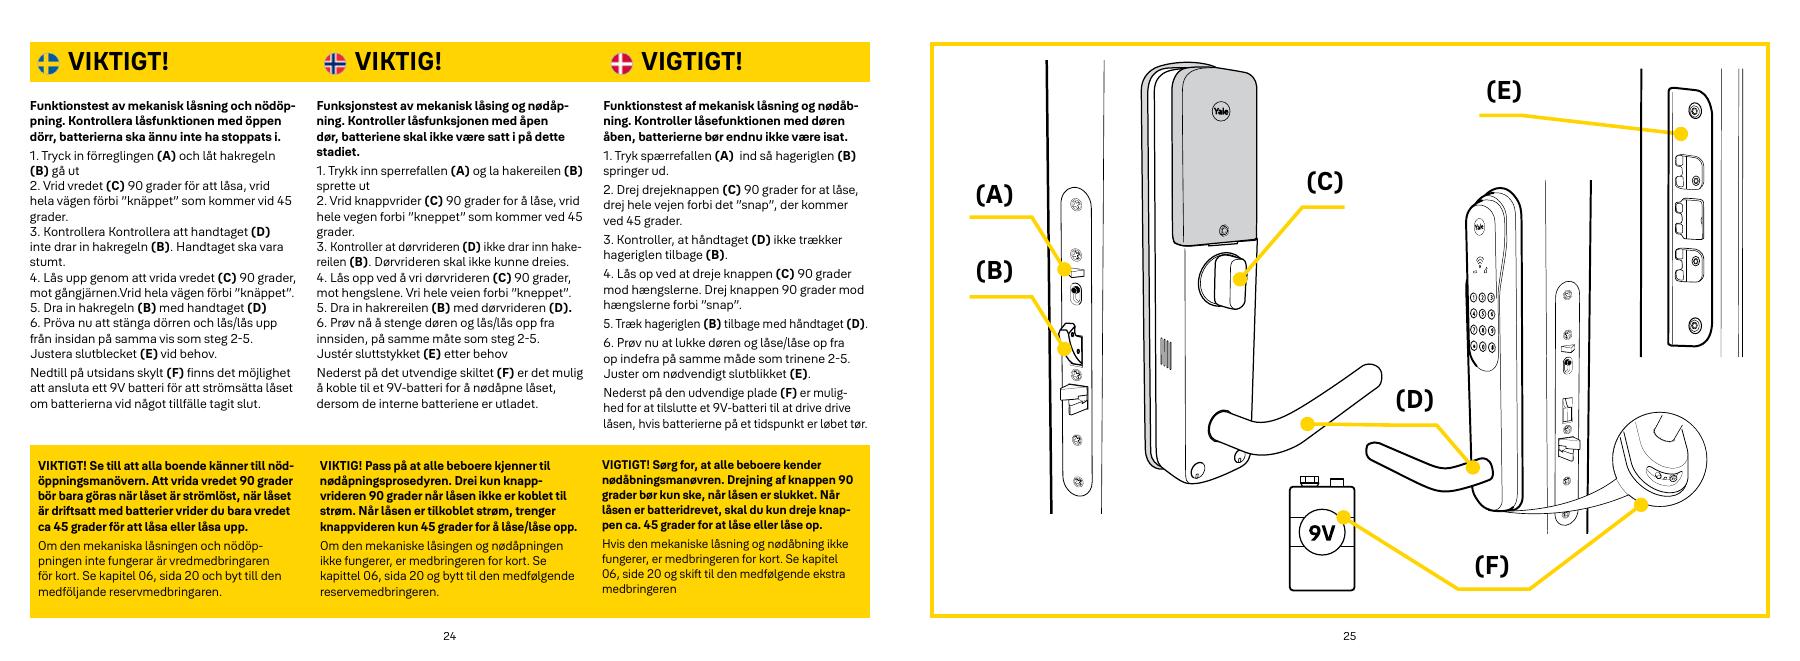
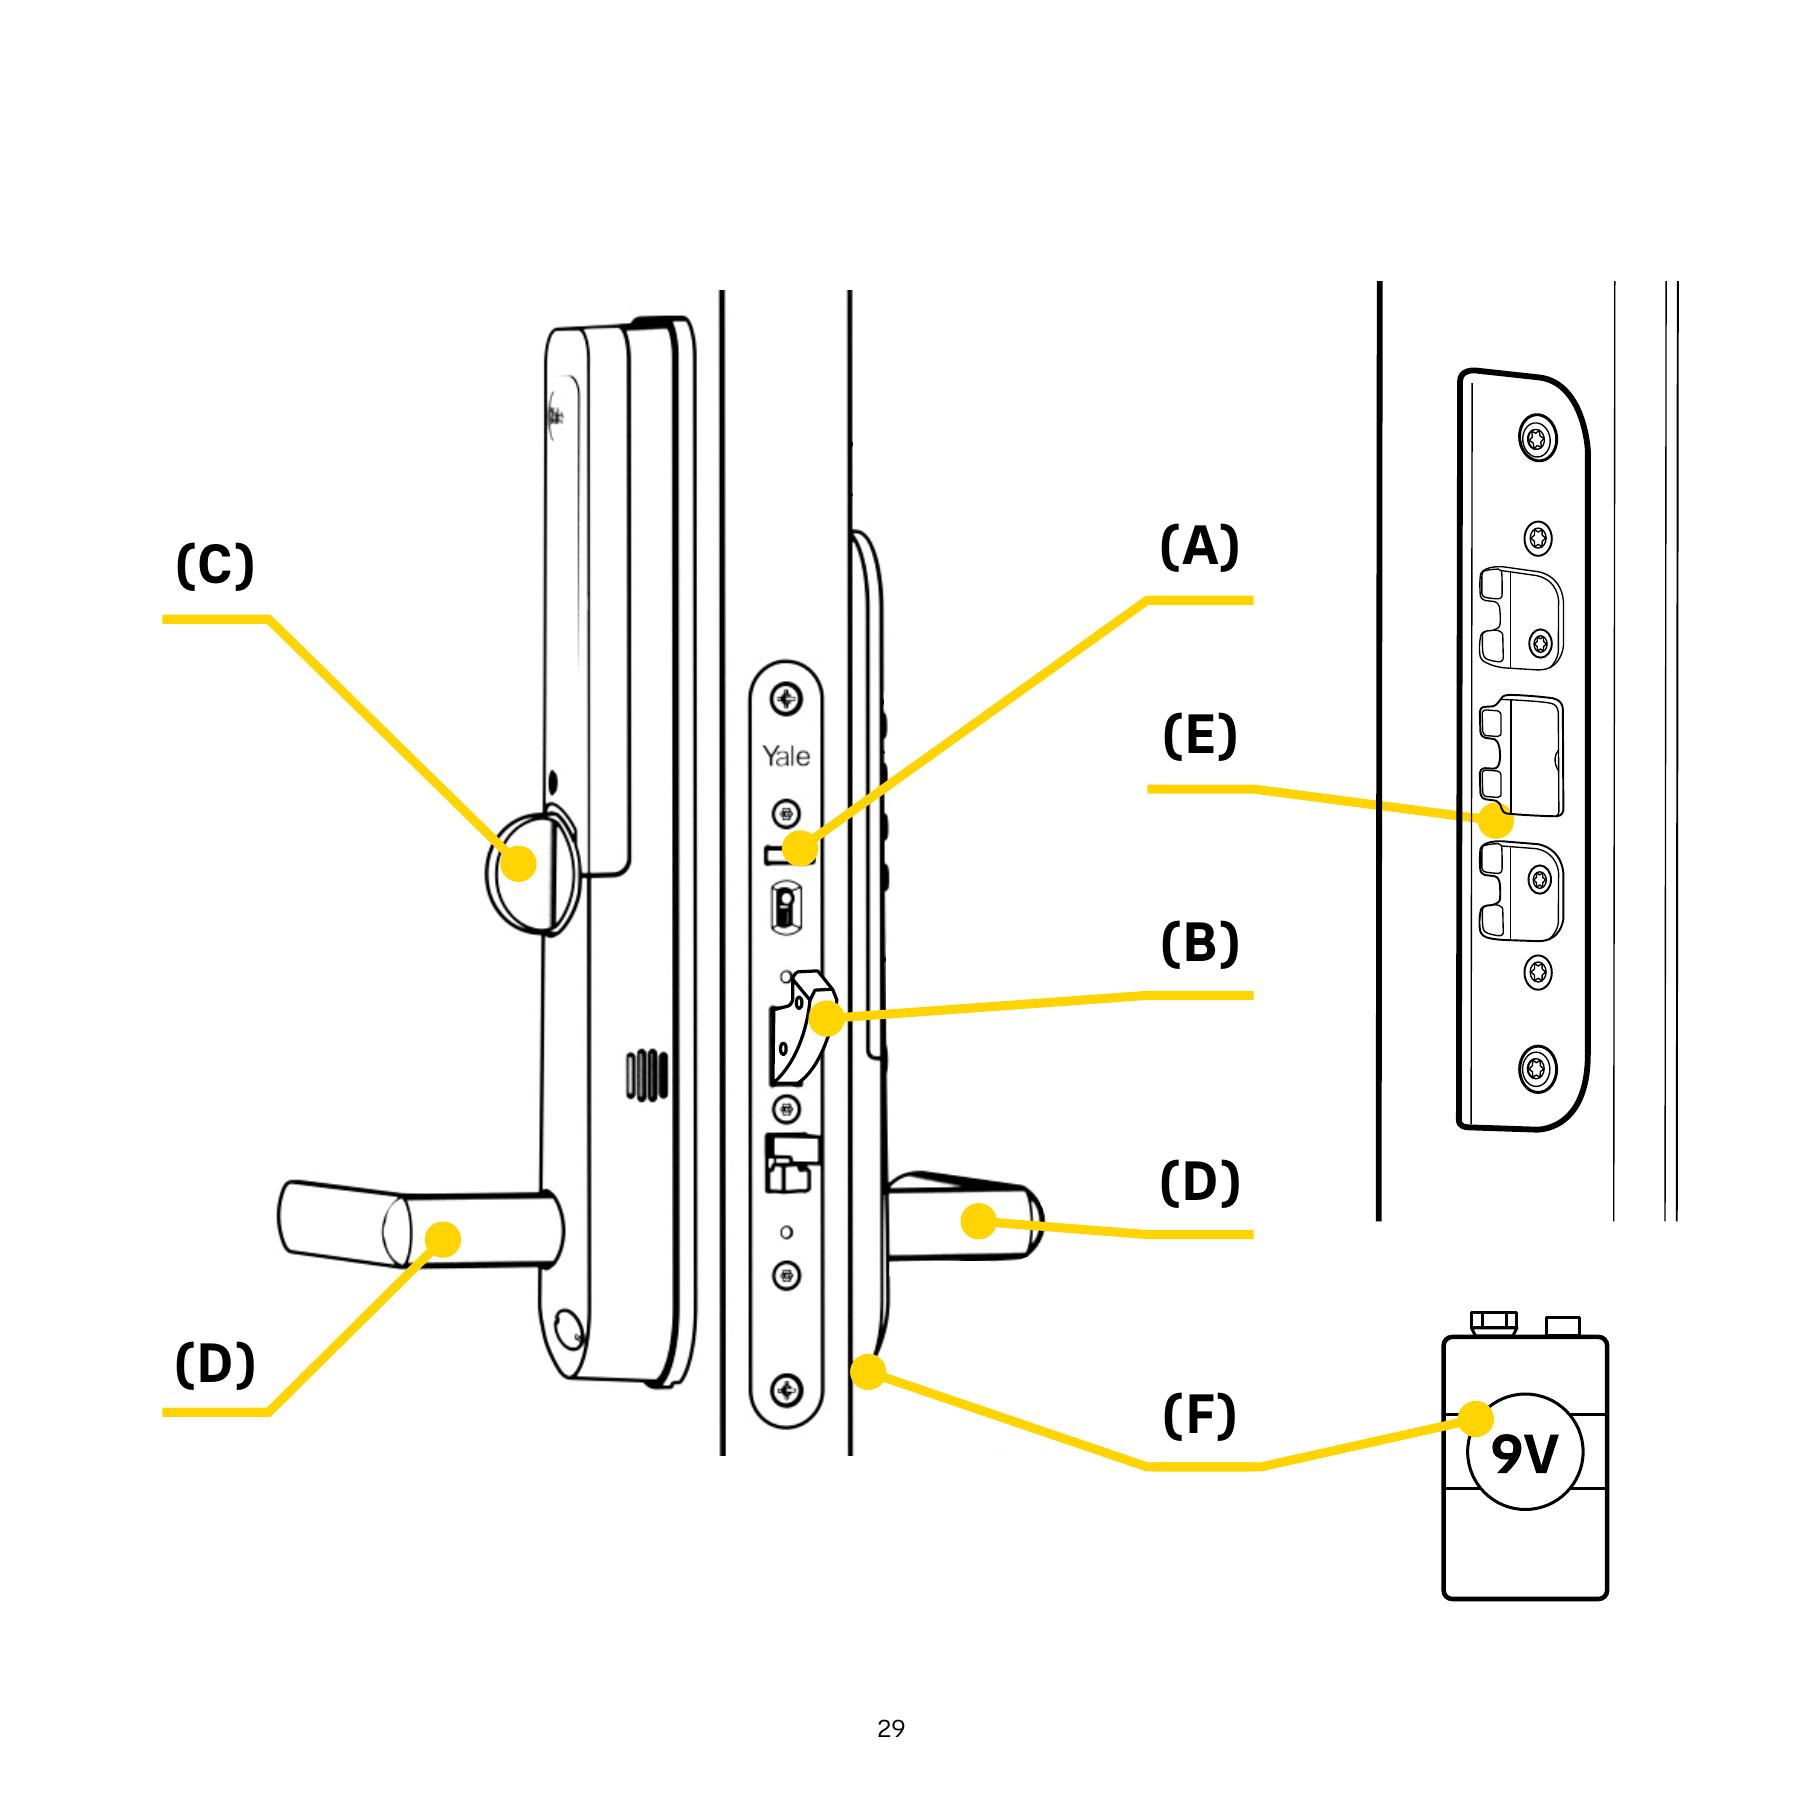
Locate the emergency power contacts underneath the outside lock unit. See label F in the original drawing below.
Original illustration from the source below. Menus and appearance may vary by version. Select to enlarge. · Source
Hold the 9 V battery terminals against the two contacts as shown in the original drawing. The battery supplies temporary power while you operate the lock.
Original illustration from the source below. Menus and appearance may vary by version. Select to enlarge. · Source
Use your normal valid code or key tag and unlock. Emergency power does not grant access without authorised identification.
Image status for this step
A dedicated image of this step has not been verified.
Once inside, replace the internal batteries following the model guide and check locking/unlocking with the door open before normal use.
Image status for this step
A dedicated image of this step has not been verified.
What you should be able to confirm
The lock responds to emergency power and opens with valid access.
After service, confirm the result with the user and notify the system manager/monitoring station as agreed. One working function does not mean the whole case is resolved.
Watch the relevant procedure
No dedicated troubleshooting video has been verified for this task. Use the specific written source below.
Still not resolved?
If there is still no response or a mechanical obstruction, contact service/a locksmith. Do not use force or a factory reset as emergency opening.
For Yale Doorman L3. You need a 9 V battery and a valid code or key tag.
For customers
Follow these steps
Locate the emergency power contacts underneath the outside lock unit. See label F in the original drawing below.
Original illustration from the source below. Menus and appearance may vary by version. Select to enlarge. · Source
Hold the 9 V battery terminals against the two contacts as shown in the original drawing. The battery supplies temporary power while you operate the lock.
Original illustration from the source below. Menus and appearance may vary by version. Select to enlarge. · Source
Use your normal valid code or key tag and unlock. Emergency power does not grant access without authorised identification.
Image status for this step
A dedicated image of this step has not been verified.
Once inside, replace the internal batteries following the model guide and check locking/unlocking with the door open before normal use.
Image status for this step
A dedicated image of this step has not been verified.
What you should be able to confirm
The lock responds to emergency power and opens with valid access.
After service, confirm the result with the user and notify the system manager/monitoring station as agreed. One working function does not mean the whole case is resolved.
Watch the relevant procedure
No dedicated troubleshooting video has been verified for this task. Use the specific written source below.
Still not resolved?
If there is still no response or a mechanical obstruction, contact service/a locksmith. Do not use force or a factory reset as emergency opening.
For a Classic/V2N that does not respond normally. This is a restart, not deletion of codes.
For customers
Follow these steps
If the batteries are dead, follow the emergency power guide first. Restarting does not replace power.
Image status for this step
A dedicated image of this step has not been verified.
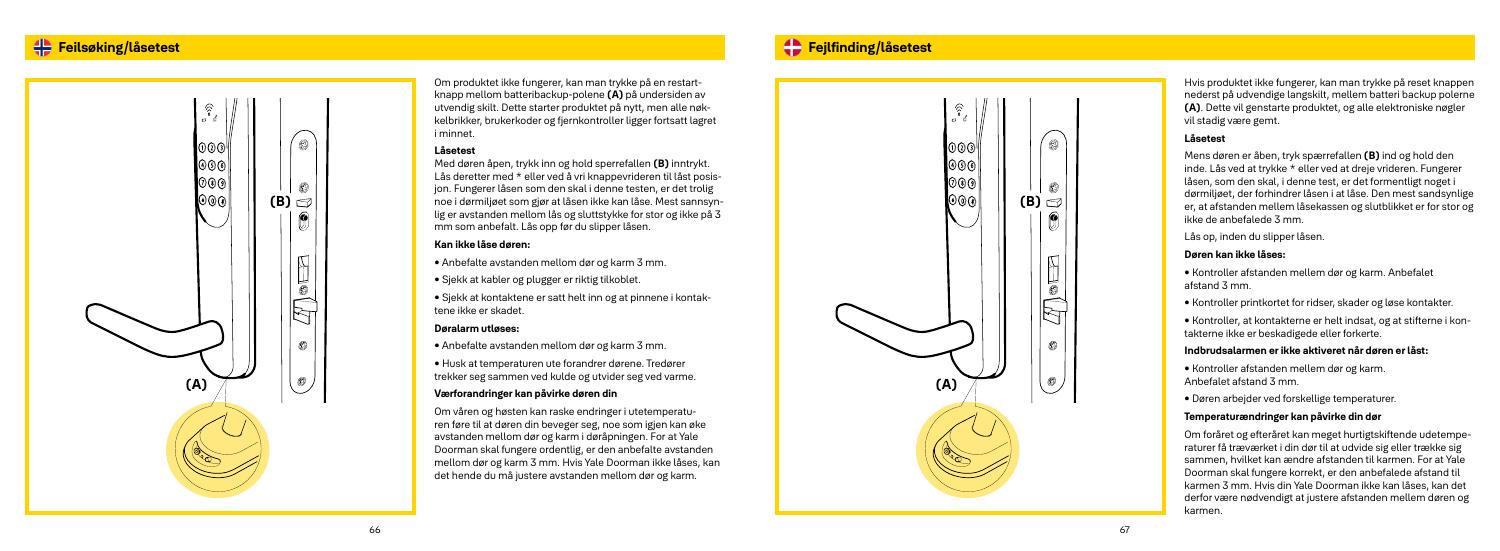
Locate the small restart button between the emergency power contacts underneath the outside unit, labelled A in the drawing.
Original illustration from the source below. Menus and appearance may vary by version. Select to enlarge. · Source
Press the exterior restart button as described by Yale. Do not substitute the P/programming button under the battery cover.
Image status for this step
A dedicated image of this step has not been verified.
When the lock responds again, try normal unlocking with valid access. Yale states that codes, tags and remotes are retained by this restart.
Image status for this step
A dedicated image of this step has not been verified.
What you should be able to confirm
The lock responds normally and existing access works.
After service, confirm the result with the user and notify the system manager/monitoring station as agreed. One working function does not mean the whole case is resolved.
Watch the relevant procedure
No dedicated troubleshooting video has been verified for this task. Use the specific written source below.
Still not resolved?
If the lock still does not respond, contact service. The original manual does not specify a hold duration; do not improvise a long reset sequence.
Yale Classic / V2N: locks with door open but not closed
For a powered lock that will not complete locking. Keep the door open during the test.
For customers
Follow these steps
Use the original drawing to identify the trigger bolt. Press and hold it throughout the described lock test.
Original illustration from the source below. Menus and appearance may vary by version. Select to enlarge. · Source
Lock using the inside thumbturn as specified in the model test. Check that the handle does not retract the locked hook bolt.
Image status for this step
A dedicated image of this step has not been verified.
Unlock again and retract the hook bolt with the handle before releasing the trigger bolt. Follow the order in the model’s original test.
Image status for this step
A dedicated image of this step has not been verified.
If the test works with the door open but not closed, the door gap and strike need checking. Ask an installer to adjust if the door requires force.
Image status for this step
A dedicated image of this step has not been verified.
What you should be able to confirm
The lock can lock and unlock without pushing or lifting the door.
After service, confirm the result with the user and notify the system manager/monitoring station as agreed. One working function does not mean the whole case is resolved.
For a powered lock that will not complete locking. Keep the door open during the test.
For customers
Follow these steps
Use the original drawing to identify the trigger bolt. Press and hold it throughout the described lock test.
Original illustration from the source below. Menus and appearance may vary by version. Select to enlarge. · Source
Lock using the inside thumbturn as specified in the model test. Check that the handle does not retract the locked hook bolt.
Image status for this step
A dedicated image of this step has not been verified.
Unlock again and retract the hook bolt with the handle before releasing the trigger bolt. Follow the order in the model’s original test.
Image status for this step
A dedicated image of this step has not been verified.
If the test works with the door open but not closed, the door gap and strike need checking. Ask an installer to adjust if the door requires force.
Image status for this step
A dedicated image of this step has not been verified.
What you should be able to confirm
The lock can lock and unlock without pushing or lifting the door.
After service, confirm the result with the user and notify the system manager/monitoring station as agreed. One working function does not mean the whole case is resolved.
Watch the relevant procedure
No dedicated troubleshooting video has been verified for this task. Use the specific written source below.
Still not resolved?
If the open-door test fails, have the lock checked before further use. State which part of the test failed.
Identify the model before intervention. L3 and L3S must not be treated as interchangeable.
For customers
Follow these steps
Confirm the lock is actually an L3 and establish whether it uses Yale Home or an alarm module.
Image status for this step
A dedicated image of this step has not been verified.
For dead batteries, use the documented L3 guide for 9 V emergency power.
Image status for this step
A dedicated image of this step has not been verified.
The newer L3S manual documents an exterior restart button. The L3 manual checked here does not confirm this procedure. Ask Yale/the installer to confirm it for your L3 before using a button as reset.
Image status for this step
A dedicated image of this step has not been verified.
What you should be able to confirm
You have selected the correct procedure for the model and symptom.
After service, confirm the result with the user and notify the system manager/monitoring station as agreed. One working function does not mean the whole case is resolved.
Images and original drawingsOriginal illustration from the source below. Menus and appearance may vary by version. Select to enlarge. · Source
Watch the relevant procedure
No dedicated troubleshooting video has been verified for this task. Use the specific written source below.
Still not resolved?
A factory reset can erase settings and access. Do not use it as the first response to an unresponsive app or lock.
For the standalone VESTA Advanced app, not SmartHomeSec. The camera/recorder must have stored video.
For customers
Follow these steps
Open live view for the correct camera. In the manufacturer’s app illustration, Playback is below the image.
Original illustration from the source below. Menus and appearance may vary by version. Select to enlarge. · Source
Tap Playback. Select the period in playback and move the timeline to the event. Menu locations may vary; see the original app video below.
Image status for this step
A dedicated image of this step has not been verified.
Check camera, date and time. If the period is empty, ask the system manager to check that recording was scheduled and storage is working.
Image status for this step
A dedicated image of this step has not been verified.
What you should be able to confirm
The recording from the selected camera and time plays.
After service, confirm the result with the user and notify the system manager/monitoring station as agreed. One working function does not mean the whole case is resolved.
Vesta Advanced: share camera access without sharing passwords
For a system owner authorised to share the device. Menu names were read from Vesta’s original app illustration.
For customers
Follow these steps
Open Device Sharing in VESTA Advanced. Select the device you have agreed to share.
Image status for this step
A dedicated image of this step has not been verified.
Under Share Account, verify the recipient account. Under Share Permission, select only the required permissions, such as Video Preview or Playback.
Original illustration from the source below. Menus and appearance may vary by version. Select to enlarge. · Source
Check Share Time. Choose a duration matching the agreement and verify the recipient and permissions before Share Immediately.
Image status for this step
A dedicated image of this step has not been verified.
Ask the recipient to open the shared camera and check the agreed functions. If access is missing, check account, duration and permissions.
Image status for this step
A dedicated image of this step has not been verified.
What you should be able to confirm
The recipient has the agreed access without knowing the owner’s password.
After service, confirm the result with the user and notify the system manager/monitoring station as agreed. One working function does not mean the whole case is resolved.
If the menus differ from the illustration, consult the app video and give support the app version. Do not grant configuration permission merely to solve a viewing issue.
DMSS: access was shared but I cannot see the camera
For recipients of shared camera access. Installing the app is not the same as having a registered account with access.
For customers
Follow these steps
Register a DMSS account and sign in. Check which account is actually signed in.
Create account → Sign in
Simplified flow diagram for this step — not a screenshot.
Give the system owner the registered account email through the agreed channel. Do not send your password.
Signed-in account → Same recipient at owner
Simplified flow diagram for this step — not a screenshot.
The system owner shares the correct device and only the agreed camera channels and permissions. Use the sharing procedure in the original source below.
Owner → Device and channels → Permissions
Simplified flow diagram for this step — not a screenshot.
Open the device list on the recipient’s phone. Check one agreed camera and try playback if recording access is included.
Recipient’s phone → Live video → Agreed playback access
Simplified flow diagram for this step — not a screenshot.
If access is still missing, compare the recipient account and shared permissions with the owner. When staff or board members change, the owner must remove previous access.
Access missing? → Check account and permissions
Simplified flow diagram for this step — not a screenshot.
What you should be able to confirm
The recipient confirms that the correct camera and agreed functions work. A message saying access was shared is not itself a functional test.
After service, confirm the result with the user and notify the system manager/monitoring station as agreed. One working function does not mean the whole case is resolved.
Watch the relevant procedure
No dedicated troubleshooting video has been verified for this task. Use the specific written source below.
Still not resolved?
Ask the owner to check sharing. Do not delete the device or share administrator passwords to work around the problem.
For Dahua systems with working live video. This identifies where an event stops; it is not a model-specific AI configuration procedure.
For customers
Follow these steps
Arrange a test with the system manager and monitoring station if applicable. Note the camera, time and expected event.
Arrange test → Camera + time
Simplified flow diagram for this step — not a screenshot.
Check live video. See whether the person is visible in the agreed area or obscured by cars or other obstacles. Seeing a person does not prove the camera classified an event.
Person in view → Event registered?
Simplified flow diagram for this step — not a screenshot.
Ask the installer whether the same test appears in the camera or recorder event log. If not, the detection area, distance, camera angle and settings for the specific model need checking.
No event → Check detection
Simplified flow diagram for this step — not a screenshot.
If the event is logged but absent on the phone, follow the DMSS notification guide. If absent at the monitoring station, ask the system manager to check alarm transmission separately.
Event in log → Phone alert / monitoring station
Simplified flow diagram for this step — not a screenshot.
Repeat the agreed test after the change. Confirm both the recorded event and receipt by the agreed recipients. Test audio/speakers separately if included in the system.
Repeat test → Confirm receipt
Simplified flow diagram for this step — not a screenshot.
What you should be able to confirm
You know whether the fault occurs before event recording, in phone notifications or in transmission. A working speaker or live image does not verify the whole alarm chain.
After service, confirm the result with the user and notify the system manager/monitoring station as agreed. One working function does not mean the whole case is resolved.
Watch the relevant procedure
No dedicated troubleshooting video has been verified for this task. Use the specific written source below.
Still not resolved?
For insufficient coverage, the installer must assess placement or an additional camera. Do not mark the case resolved until the agreed function has been tested.
Ajax KeyPad: find the manual for the correct keypad
For KeyPad. KeyPad Plus and other models have separate manuals; identify the device first.
For customers
Follow these steps
Open the correct system in the Ajax app and find the keypad in the device list. Check the model name before using a code or battery guide.
Correct system → KeyPad
Simplified flow diagram for this step — not a screenshot.
Open the device settings if you have access. The KeyPad manual lists User Guide as the link to its user manual.
KeyPad → Settings
Simplified flow diagram for this step — not a screenshot.
Select User Guide. If the option or permission is unavailable, open the direct KeyPad source below or ask the system manager for help.
User Guide → Original manual
Simplified flow diagram for this step — not a screenshot.
Check that the manual model and task match your keypad. Use the section for the relevant function; do not select Delete Device as troubleshooting.
Model → Correct section
Simplified flow diagram for this step — not a screenshot.
What you should be able to confirm
You have opened the manual matching the keypad and can follow the correct section.
After service, confirm the result with the user and notify the system manager/monitoring station as agreed. One working function does not mean the whole case is resolved.
Watch the relevant procedure
No dedicated troubleshooting video has been verified for this task. Use the specific written source below.
Still not resolved?
If the screen and manual differ, note the model and app version and ask the system manager to clarify.